Step-by-step, what it's like.
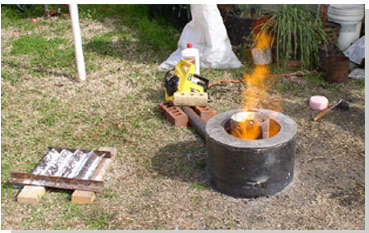 casting sessionI use a trolley for the furnace as it weighs about eighty pounds. I take the furnace out of the garage into a safe place on dry ground, where there were no flammable materials nearby. I hold the lid out and keep it nearby. I take out the propane tank and burner, put in the burner into the furnace, and insert a shim underneath the burner to give it support. I put on my gloves and safety glasses, hold a fistful of pine needles and dropped them into the furnace. I opened the valve on the top of propane tank, while making sure that the reader reads. After this, I light the needles on fire, and opened the fine valve on burner, and to get a nice hot flame. I put a fistful of little (marble-sized) chunks of aluminum in the crucible and lower it in using a big iron hook. The furnace is ready to growl on its own for some time now.
I place the wooden image of what I required to cast on a piece of plywood. It dust it with parting dust (such as the chalk or graphite powder). The upper form is laid around the piece. I placed a sprue riser beside it, which will be the pouring hole; this is a 2x2", which has has a slight taper cut on it that makes it easy to to extract out of the form.
I used a fine riffle and brushed the sand onto the top of the forms with a kind of butter-spreading movement with a trowel, packed it down and around the forms utilizing my hands, add more, then slightly tamp it down using a hammer handle or something else, such as fill, hammer, etc, and completed it with a flat top. At different points, during this process, I keep on checking the furnace, rotating the crucible half a turn, and in the case, there is a nice heel of molten metal in the crucible, I start adding in larger chunks.
Back to the form: I lay a piece of plywood on the top of mold, so that now I have a sandwich of upper plywood, frame totally filled with sand, and the lower plywood. I flip this complete thing and take off the top piece, which was the lower board -- so that now I can view the back of the wooden image. Keep the lower form on, and dust the overall surface using parting dust. After this add sand with a fine riffle, pack more gently, repeat the process till it is scraped off.
While doing this, I check the furnace, and add more metal.
After this, I lift the upper form off the lower, removed the wooden image (this is referred as rapping, since you smack it a bit to both sides a little to set the sand around it, and maybe dribble some water at the edges of the form so that the sand retain its shape. Next I smoothly draw it out of the sand that I accomplished by having drilled a couple of holes in the form and covered them with a scotch tape. Now I thread the wood screws into these holes and use them as handles).
After this, I removed the sprue riser, cut a sprue from the sprue riser to the form, then I use a long wire and press it through the mold from the inside to the outside in various places to let the air vent out. I used a hacksaw blade for cutting the sprues from the pouring hole to the form. Things like steel conduit pipe, cut long wise can be used to form something like a very long, narrow trowel. After cutting the sprues, you may slightly tamp the sand back into place using your fingertips.
Then, I lift the one form and keep it back on the other, aligning the alignment pins and gently, leaving them go together. Then, I put the insert flask pins to hold the two together.
Now, I have got the void space inside the form, and a hole that leads into the void space.
 I checked the metal, generally by this time it is hot to trot. You do not want to pour too hot, nor too cold. Cold results to skulls and clogs in the mold since the metal does not passes through the whole mold space. Too hot results in porosity. I generally pour when the metal is just merely glowing, in dark space.
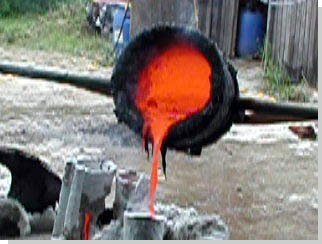
This is the time, where the fun bit actually comes in. I placed a muffin tin down beside the mold and cut the flame to the burner off and pulled the burner out of the furnace. In my left hand I was having the big iron hook and in the right hand I was holding the crucible tongs. My face was shield on. I crouch besides the furnace and lift off the lid, laying it out of the way. I hook the crucible, lift it out, and lower it into the tongs that are braced by the length of my arm and leg, both. When I realized I have got a good firm grip on the crucible, I dropped the iron hook and took hold of the tongs with my left hand as well, turn a bit, and pour into the flask. As soon as the metal has filled the flask adequately to have a nice big ingot sitting on top of the sand, I pour the excess good metal into the muffin tins, as much as I can get easily, and then I turn slightly more and rap the crucible lightly on the ground to dislodge all the slag and bump it out on the ground.
I placed the lid back on the furnace and put a rock in front of the burner orifice, and left the furnace to cool down. It takes about 6 hours to cool down. After this, I turned the propane valve on the tank to off, vent the propane left in the line, cleaned up the riffles and sand tools, and put away the things, which I have used, leaving only the furnace and the mold. Now, I let the mold to sit for about half an hour before breaking it open. I punch it out over the main supply of casting sand and used pliers to pull the form that is embedded in hard, dried sand, out of the sand box. After this, I knock the dried sand off and carry the casting to a hose where I washed it off.
And that is all of the process!
» If you want to share your experience, do write to us along with images and description of your casting at: info@themetalcasting.com