Imagine, you have just found that you can melt and cast metals in your own backyard foundry and you feel excited at the possibility of making your very own metal castings. The excitement grows as you begin to slowly understand the; how, what & when of this traditional metal craft.
You can easily produce your own shop tools from simple things available in your home. Usually it does not cost more to outfit a home foundry – and you can raid your kitchen or workshop for products, too!
It is very fairly easy to set up a useful foundry at home, subsequently—if you enjoy messing around the house—you may already have on hand most of what you need to set up one. And metal casting is an art that harbors no secrets: If you can play a whistle, you can produce a pattern ... if you have ever constructed sand castles, you can create a mold and if you can boil water, you can melt metals and pour it into the mold. It is actually very simple.
Foundry FuelFoundry FuelVery readily available materials can be used to set up a hobby foundry. For instance, wood charcoal can be used as a foundry fuel, although the casting industry extensively uses natural gas as foundry fuel. While being inexpensive and easily available, charcoal can be used to fire a foundry, which is constructed in a rural area. Moreover, charcoal can even be produced right on the homestead.
FurnaceTo use the efficiency of fuel, a suitable over is required. This oven can be easily made from scrap at a very nominal cost. A good furnace for a home foundry can be a simple drum, with a removable lid, which is lined all around with about 2 inches of castable refractory. This drum is designed with an air-feed tube built into its bottom and is fitted with an adjustable-for-flow blower to furnish the draft required to generate intense heat.
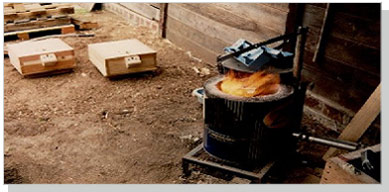
First of all, determine the size of furnace required to handle the parts, which you have planned to make. It would be even better, if you can find a 30-gallon drum and a 5-gallon paint pail. This can build a furnace, which will be sufficiently tall to hold most pieces of melting scrap, regardless how oddly they may be shaped.
After selecting a suitable furnace vessel, develop it by first slicing off its lid - near the top most seam—then cut a hole in its side, near bottom. The hole should be sufficiently to fit a 16" section of 1-1/2" feed pipe. Thread a 90 & deg the elbow to inside terminal of this nipple. After this, weld the assembly to the wall of canister, with the elbow pointing in upward direction. Next, make a hole in the middle of lid section, and weld a small length of 2 & quot the muffler tubing in place, permitting it to protrude below the lid's lip lightly. Then fix some handles—made from small pieces of 1/8" X 3/4" flat stock and 6" pieces of 1/2" pipe—to the sides of the faces of container.
Due to the extreme temperatures generated within the furnace, its floor, inner walls, and lid should be lined with the refractory material. The outer skin of the smaller of the two vessels should be coated with oil to allow for its easy removal. Next, place the vessel upright on top of the elbow and the "pasty" base pour, ensuring that it is centered evenly within the drum of furnace. Then go ahead to fill the wall cavity with refractory in the same manner, you did the bottom. Complete the job by inverting the lid and lining it, to the degree of the muffler pipe, in a similar manner. When the refractory becomes dry, take out the inner vessel and treat the furnace by burning charcoal in it—closed—for a minimum of 12 hours.
After this has been done, cut off a piece of 1/8" expanded metal into a disk just adequately large to slip inside the furnace. Next, connect a blower to the feed pipe. This can be done with the help of a coupling, a welded plate, or even a piece of inner tube of bicycle if that is what it takes to produce the hookup.
FlaskFlask is the second most important foundry component, which can also be easily constructed too.
Flask is the term that is used to describe a box or container in which the pattern is placed and then packed with sand. Cope and drag pertain to the upper and lower halves of the flask, respectively (in two-part molds). Anything, which will keep sand firmly in place can be used as a flask.
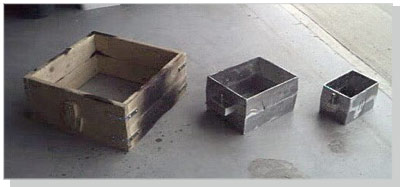
In simple form, a flask is just a two-part open-ended box that holds the sand, which forms the mold. Depending on the size of castings you are required to make, you can make the flask large or small. If required, the depth of the flask can be increased by fitting a simple 4 sided cheek between the components.
To design a simple flask for uses in home foundry, first of all find yourself some clear, straight 1 X 4 and cut off 8 sections from it. Of these 8 sections, 4 should be of 10" in length and other 4 about 12" long. Then clip off eight 2" slices and make the pair of boxes. Use glue and wood screws to keep the boards together.
While doing this step, be careful to make two sets of keys for the sides of the flask. It is essential that the cope and drag fit the flush in a consistent manner, so that the mold will separate cleanly at the parting line. In the end, seal all the wood with a quality waterproofing agent.
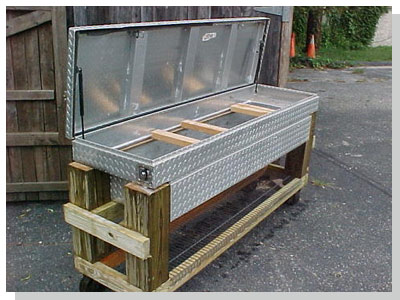
Riddle & Molding Bench:A riddle is simply a sand filter that can be built by nailing together a 16" X 16" frame constructed from 2 X 4 and tacking some 1/4" hardware cloth across it. The molding bench is a 2 X 4 wooden frame around 36" square, with a 1/2" plywood bottom. AT last, design at least 2 pattern boards, by cutting plywood sheets little bigger than than the flask and coat them with a wood sealer.
You can find most of the remaining tools and supplies in your kitchen, workshop, or if you life fancy – you can find it from an art and craft supply store. Some of the things that you will require are -
- A wooden hammer handle about 10" long for a rammer.
- A piece of 1/2" conduit or tapered dowel, 6" in length, to function as a sprue pin.
- A smooth dowel, 1/2" X 6", for a riser pin.
- A variety of small spoons and knife blades.
- A sprinkling can.
- An iron rod with a hook bent into one end and a handle into the other.
- A 6" cast-iron bean pot to function as a crucible.
- A pair of scissors-type tongs at least 24" long.
- A wooden straightedge.
- An artist's brush of camel's hair.
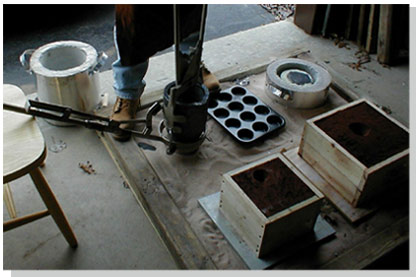
- A tin muffin pan.
- A variety of iron pots and pans of different sizes.
- A small rectangular tin bread pan.
- A rapper (simply a big washer with a steel handle welded to it ... or a tuning fork).
- A skimmer that spoon like affair with a two-foot rod handle.
You will also need some casting sand that you can get from a local commercial foundry, as it is difficult to locate suitable indigenous material. Olivine sand is considered as the best choice, though black Albany sand also works well. You will also need some pumice dust, to work as parting powder.
Now you are ready to make the mold.
Safety Note:Metal casting is a dangerous, and hence safety aspects are crucial. Always wear leather boots and gloves eye protection while working in the foundry. Never pour water on molten metal. Always use sand to keep, or put out, a pouring-related smolder or fire. Set the foundry in a well-ventilated area or outdoors. Avoid breathing both the aluminum fumes or charcoal, as they are toxic. Keep water—in any quantity - out of the crucible.